

So, you’re thinking about rescreening your porch. It’s one of those home improvement projects that pays off instantly—goodbye, torn, faded screens and hello, bug-free relaxation. In the Tampa Bay area, the typical cost to rescreen a porch falls somewhere between $400 and $1,500, depending on the size and materials you choose. It’s a smart investment to reclaim your outdoor space and make it a comfortable retreat again.
Your Quick Guide To Porch Rescreening Costs
Before you start planning, it helps to have a solid idea of what to budget. While every porch has its own quirks, you can get a pretty good ballpark figure by looking at typical price ranges based on square footage. The final number is always a mix of materials, labor, and any specific needs your porch might have.
Across the country, 2025-2026 industry data shows the average cost to rescreen a standard 200-square-foot porch is around $400 to $800. That breaks down to just $2 to $4 per square foot for a professional job.
The good news? Tampa’s competitive labor market keeps our local prices reasonable. We’re not seeing the sky-high quotes you might find in other parts of the country.
Setting A Realistic Budget In Tampa Bay
For homeowners around here, a simple breakdown can help set clear financial expectations. The logic is simple: the bigger your porch, the more materials and time are needed, which is reflected in the final cost.
To give you a better idea, here's a look at what to expect for different porch sizes in our area.
Estimated Porch Rescreening Costs In Tampa Bay
Here is a quick snapshot of typical costs based on porch size, which is a great starting point for your budget.
- Small Porch (100 sq. ft.): Average Cost Range of $400 – $650
- Medium Porch (200 sq. ft.): Average Cost Range of $650 – $950
- Large Porch (300+ sq. ft.): Average Cost Range of $950 – $1,500+
Keep in mind these are just estimates. The final price can shift based on your choice of screen material, the condition of your frame, and other factors we'll get into.
A full rescreen is almost always more cost-effective in the long run than patching up individual panels. It guarantees a uniform look, consistent durability, and takes care of all potential weak spots at once.
Ultimately, a full rescreen is like hitting the reset button for your entire enclosure. This approach doesn't just fix the obvious damage—it replaces all the aging materials that might fail next, saving you from future service calls and giving your outdoor space a clean, cohesive look for years to come.
Understanding The Key Factors That Influence Your Price
When you get a quote to rescreen your porch, the number you see is a lot more than just the square footage. Several key variables come together to determine the total investment, and knowing what they are helps you understand exactly where your money is going. Think of it like buying a car—the base model has one price, but as you add features like a better engine or leather seats, the final cost changes.
It’s the same deal with your porch. The type of screen you choose is one of the biggest drivers of the price. Standard fiberglass mesh is the most budget-friendly route, but if you upgrade to a heavy-duty pet screen or a solar screen to block heat, your material costs will go up. Each option strikes a different balance between durability, visibility, and special features, and that choice is directly reflected on the final bill.
Beyond The Basics: Porch Complexity
The physical layout of your porch plays a huge role, too. A simple, rectangular, ground-level porch is pretty straightforward for a professional to tackle, meaning less labor time. However, the cost to rescreen a porch can definitely climb when the job gets more complicated.
Here are a few things that add to the labor time:
- Height and Accessibility: A second-story porch isn’t just a porch—it’s a project that requires ladders, scaffolding, and extra safety measures. That extra setup and risk naturally increase labor costs.
- Unique Angles and Shapes: Porches with lots of corners, arches, or odd-sized panels are more demanding. Each non-standard section requires more precise cuts and meticulous installation.
- Number of Panels: More individual panels mean more time spent carefully installing the spline that holds each section tight. Even if the total square footage is the same as a porch with fewer, larger panels, the extra labor adds up.
Uncovering Potential Hidden Costs
Beyond what you can see, the condition of your enclosure's frame is a critical factor. During an inspection, a pro might find issues that need to be fixed before any new screens go in. Taking care of these problems is essential if you want your new screens to last.
While it may be tempting to cut corners, addressing underlying frame issues and using high-quality fasteners is non-negotiable for a durable, long-lasting result in Florida's humid and salty air.
Common extra costs can pop up from repairing bent or corroded aluminum frame pieces or replacing rotted wood. In our coastal climate, upgrading to corrosion-resistant fasteners is also a smart move to prevent ugly rust stains and structural weakness down the road. If the structure needs significant work, permits might even be required, adding another layer to the project. The process for bigger jobs often involves similar issues, which is something to keep in mind if you're also wondering what is involved with rescreening a pool cage.
A look at industry-wide figures shows just how much prices can vary. For example, some reports show an average porch rescreening can run anywhere from $700 to $4,000, with labor and the type of mesh being the main drivers. Breaking it down, a 200-square-foot porch might land somewhere between $400 and $800, while a larger 400-square-foot space could be in the $800 to $1,600 range. These numbers really highlight how size, materials, and labor all come together to shape your final quote. You can dig deeper into these averages and find additional porch repair cost details online.
Choosing The Right Screen Material For Your Home
Think of picking a screen material like choosing tires for your car. Sure, any tire will get you down the road, but the right one depends on whether you're cruising down a smooth highway or tackling a rugged trail. In the same way, your choice of porch screen directly impacts the final cost, how long it lasts, and whether it holds up to your family's lifestyle.
The decision is about more than just the price tag; it’s about finding the perfect match for your needs. Do you need something tough enough to handle a playful dog? Or is your top priority keeping out those tiny, annoying no-see-ums? Each material brings something different to the table, and figuring out what works for you is the key to a smart investment.
This infographic breaks down the biggest factors that will shape your final quote for any rescreening project.
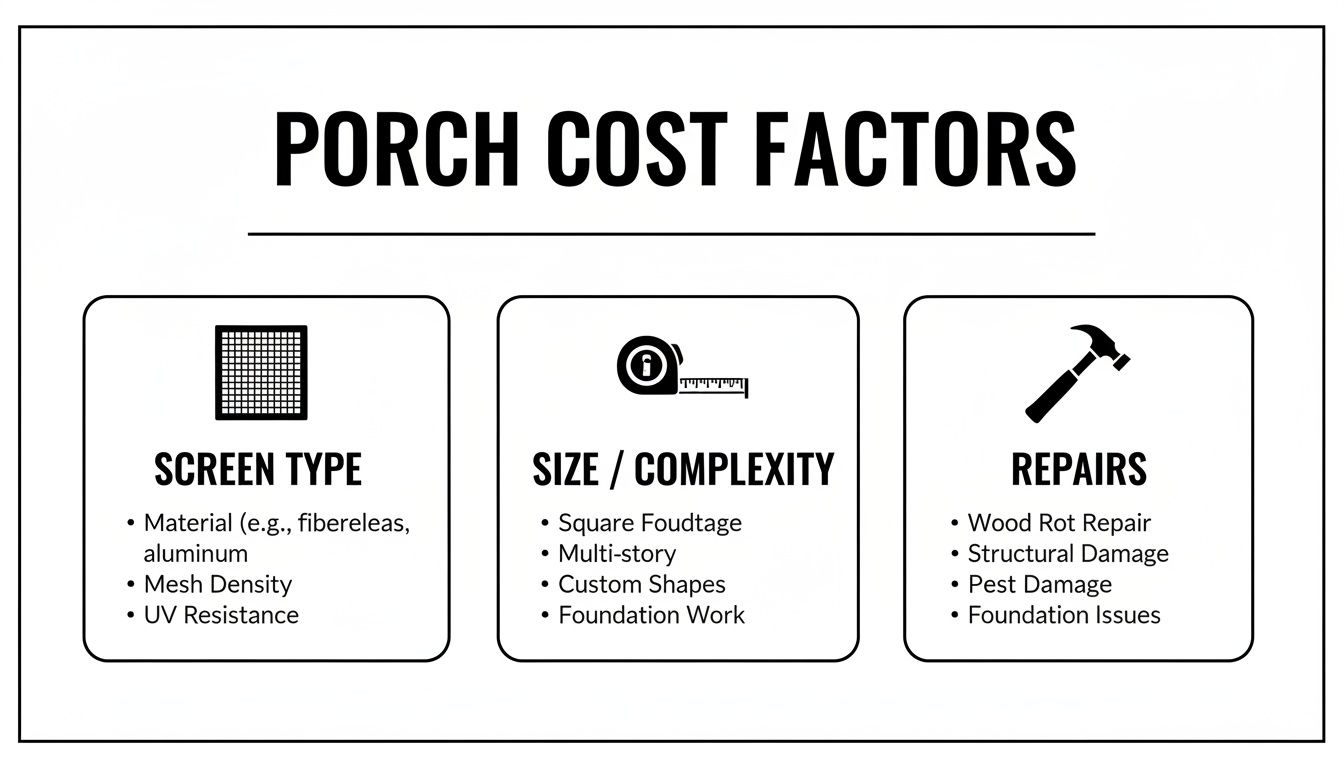
As you can see, the screen type, the size of your porch, and the condition of the existing frame are the three heavy hitters that influence your project's cost.
Comparing Popular Screen Materials
To help you make the right call, let's dive into the most common screen types you'll find on the market. Each one has a specific job, and their costs vary based on durability and special features. Knowing the differences helps you strike the right balance between your budget and your long-term vision for your outdoor space.
Here’s a quick-glance comparison to help you review your options. It breaks down the costs and benefits so you can see what makes the most sense for your home.
Screen Material Comparison Cost Vs Benefits
Standard Fiberglass
- Average Cost Per Sq. Ft.: $1.50 – $2.50
- Key Benefits: Budget-friendly, good visibility & airflow.
- Best For: General use, keeping out standard insects like flies and mosquitoes.
Aluminum
- Average Cost Per Sq. Ft.: $2.00 – $3.50
- Key Benefits: More durable than fiberglass, resists sagging.
- Best For: Porches needing a rigid, long-lasting screen without pets or active kids.
Pet-Resistant
- Average Cost Per Sq. Ft.: $3.50 – $5.00
- Key Benefits: 7x stronger than fiberglass, resists tears from claws.
- Best For: Homes with dogs, cats, or small children who might push on screens.
No-See-Um (20×20)
- Average Cost Per Sq. Ft.: $2.50 – $4.00
- Key Benefits: Tightly woven mesh blocks tiny gnats and insects.
- Best For: Homes near coastal or marshy areas where no-see-ums are a problem.
Solar Screen
- Average Cost Per Sq. Ft.: $4.00 – $6.00+
- Key Benefits: Blocks UV rays, reduces heat, prevents furniture fading.
- Best For: Porches with heavy sun exposure; homeowners looking to create a cooler space.
Now that you have the overview, let's explore each one in a bit more detail.
-
Standard Fiberglass Screen: This is the go-to for many homeowners and the most budget-friendly choice. It does a great job with visibility and airflow, making it a solid all-around option for keeping out common pests like flies and mosquitoes. The downside? It’s the least durable against pets or heavy wear and tear.
-
Aluminum Screen: A definite step up in durability from fiberglass. Aluminum screens are more rigid, so they're less likely to sag over time. They hold up great against the Florida elements but can get dented or creased if something hits them, so they aren't always the best fit for homes with active kids or pets.
-
Pet-Resistant Screen: If you have dogs or cats, this screen is an absolute game-changer. It’s made from a heavy-duty, vinyl-coated polyester that's seven times stronger than standard fiberglass. It’s designed to resist tears and punctures from claws, saving you a ton of money and headaches on frequent repairs.
-
No-See-Um Screen (20×20 Mesh): Anyone who lives in Florida knows about the infamous no-see-ums that can squeeze right through standard screen mesh. This tightly woven screen is engineered specifically to block those tiny biting gnats, giving you maximum protection if you live near the coast or marshy areas.
Choosing a screen isn't just about what you want to keep out; it's also about what you want to let in. Consider the balance between visibility, airflow, durability, and protection to find the perfect fit for your porch.
- Solar Screen: These screens are designed to block a large portion of the sun's harsh UV rays. This helps keep your porch cooler and stops your patio furniture from fading. For anyone trying to beat the Florida heat, learning about energy-efficient screen solutions can be a huge benefit. They cost a bit more upfront, but the added comfort and protection are often well worth the investment.
DIY vs. Professional Rescreening: A Realistic Comparison
The thought of tackling a porch rescreening yourself is tempting. It seems like a straightforward way to save some money, right? While a DIY approach can be satisfying, it's crucial to look past the sticker price of a roll of screen and weigh the true costs—in both dollars and hours—against bringing in a pro.
When you go the DIY route, your initial shopping list is simple enough: screen mesh, spline, and maybe a few fasteners. The real costs, however, often hide in the tool aisle. You'll absolutely need specialized gear like a spline roller, which is the key to getting that screen perfectly tight and secure. Without the right equipment, you're setting yourself up for a frustrating, amateur-looking result.
Beyond the tools and materials, the biggest investment is your own time and the steep learning curve. Installing screen panels requires a ton of patience and a steady hand to avoid common headaches like sagging, wrinkles, or accidental tears. One slip-up can mean scrapping an entire panel and starting over, wasting both your time and expensive material.
The Real Cost of a DIY Project
Let's get real about what a DIY rescreening project actually involves. It’s far more than just the screen you grab from the big-box store; it's a full package of expenses, effort, and potential frustration.
- Material Costs: Retail prices for screen mesh can run anywhere from $0.50 to over $2.00 per square foot, depending on the quality and type. You'll also need spline, the rubber cord that locks the screen into the frame.
- Tool Investment: A decent spline roller, a sharp utility knife, and other hand tools will likely add $20 to $100 to your budget.
- Your Time: This is the biggest "hidden" cost by a long shot. A job that a professional crew can knock out in a few hours could easily eat up your entire weekend, especially if your porch has a tricky layout.
The Professional Advantage
Hiring a professional team completely changes the game. Sure, the upfront cost to rescreen a porch is higher because you're paying for labor, but what you're really buying is expertise, efficiency, and total peace of mind. A pro crew shows up with commercial-grade tools and materials, ready to get the job done right the first time.
A professional installation guarantees a flawless, drum-tight finish that’s incredibly difficult for a novice to replicate. This doesn’t just look better—it actually extends the life of your screens by preventing the sagging and wear that plague DIY jobs.
Pros are also trained to spot underlying problems an untrained eye would miss, like bent frame sections or corroded fasteners. Fixing these issues during the rescreening process saves you from much bigger, more expensive repairs down the line.
Plus, a reputable company provides a warranty on their workmanship. That’s a safety net you just don't get when you go it alone. While DIY is perfectly fine for small patches, like learning how to repair window screen holes, a full porch rescreen is a whole different ballgame. In the end, that extra cost for professional service almost always translates to a higher-quality, longer-lasting result that saves you from future headaches.
What To Look For In A Professional Rescreening Estimate
Getting a quote from a screening company is a big deal—it’s the moment you find out the real cost to rescreen a porch. A good estimate is so much more than just a number on a piece of paper. Think of it as a detailed blueprint for your project, designed to make sure there are no surprises waiting for you down the line. It's a direct reflection of a contractor's professionalism and tells you exactly what you're paying for.
A trustworthy estimate should always be in writing and broken down line by line. This level of detail is your best tool for comparing different offers fairly and making a smart decision. Be wary of vague, one-line quotes, as they often hide extra charges or lower-quality materials. Always insist on seeing a complete breakdown.
Key Components Of A Clear Estimate
When you get a quote, it should read like a straightforward project plan. You want to see a list that separates the major cost categories, because that kind of transparency is the hallmark of a company that knows what it's doing.
Here are the non-negotiable details that must be included:
- Material Costs: The estimate needs to spell out the exact type and brand of screen being used (e.g., Phifer PetScreen, Solar Screen) and its total cost.
- Labor Charges: This section should clearly state the cost of the work itself, reflecting the time and skill needed for a professional job.
- Frame and Hardware: Any necessary frame repairs or the cost of new, corrosion-resistant fasteners should be listed as separate items.
- Project Timeline: A professional quote will give you an estimated start date and a projected completion time, so you’re not left guessing.
Questions To Ask Before You Sign
Your consultation is the perfect chance to feel out a potential contractor and get answers to any lingering questions. Don't be shy about asking for specifics—a true professional will be happy to explain everything clearly. Having the right questions ready helps you partner with a team you can rely on.
A detailed estimate doesn’t just protect you from surprise costs; it acts as a written agreement on the scope of work. It’s your best guarantee that the job will be done right and to industry standards.
Before you commit, be sure to ask about their warranty on both materials and workmanship. You'll also want to inquire about their licensing and insurance, as this protects you from any liability. It's also a great idea to ask what specific type of fasteners they use—here in Florida, corrosion-resistant options are a must. For more tips on getting your porch ready, check out our guide on how to prepare your enclosure for rescreening. This knowledge will give you the confidence to choose a true partner for your home.
Answering Your Top Questions About Rescreening Costs
Once you start thinking about rescreening your porch, a few key questions always pop up. Getting straight answers helps you budget with confidence and make the right call for your home. We've pulled together the most common questions we hear from homeowners around Tampa Bay about the cost to rescreen a porch.
Let’s clear things up so you feel totally prepared, from the lifespan of your new screens to the value they bring to your property.
How Often Should I Rescreen My Porch In Florida?
Here in Florida, our climate is tough on screens. Between the intense sun, humidity, and salty air, even high-quality screens have a lifespan. For a standard fiberglass screen, you can realistically expect it to last seven to ten years. Over time, the UV rays and storms will make the material brittle and faded.
But you have options. If you upgrade to a more rugged material like a pet-resistant or polyester mesh, you can easily stretch that timeline to 10 to 15 years or more. A little regular cleaning and fixing small tears promptly will also go a long way in getting the most out of your investment.
Will A New Screen Add Value To My Home?
It absolutely will. Think about it from a buyer's perspective: a freshly rescreened porch is a huge plus. It boosts curb appeal instantly and sends a clear signal that the home has been well cared for. It also presents a clean, functional, and bug-free outdoor living space—a feature that’s high on the wish list for anyone looking to buy in Florida.
While it might not add value in the same dollar-for-dollar way a full kitchen remodel does, it makes your property far more attractive and can help it sell faster. For a pretty minor investment, the return you get in marketability is significant.
Can I Just Replace One Torn Panel?
Yes, you can definitely replace a single damaged panel. It's a common request and a decent quick fix. But honestly, it's often not the best move in the long run. If one screen panel has given up due to age and sun exposure, you can bet the others are right behind it.
Patching just one panel can create a "checkerboard" look, where the new screen is dark and clean next to the older, sun-faded ones. A full rescreen guarantees a uniform appearance, consistent durability, and takes care of all the potential weak spots at once, saving you from another service call in a few months.
Spot repairs are great for accidental damage on a fairly new enclosure. For older porches showing their age, a complete rescreen is the smarter, more comprehensive choice.
Ready to restore your outdoor oasis with a flawless finish? Rescreen Rescue offers expert screen repair and replacement with fair pricing and unmatched quality. Get your free, no-obligation estimate today!