


TL;DR:
- Most popped screen panels can be repaired by re-splining if the mesh and frame are intact, saving costs.
- Structural damage or extensive failures require professional repairs or full enclosure rescreens, especially in hurricane zones.
Yes, most popped screen panels can be repaired without replacing your entire enclosure. If the mesh is intact and the frame isn’t bent, re-splining the panel yourself is usually a 30–90 minute fix that costs a fraction of a professional visit. For a single panel with a loose or dried-out spline, that’s your first move. If the frame is bent, anchors are sheared, or more than 25% of your enclosure’s panels are failing, skip the DIY route and call a contractor. Either way, start with a quick inspection: check the spline channel, the mesh condition, and the frame before you buy anything.
Professional screen panel repair for a single panel typically runs in the low double digits on the low end and can climb into the low triple digits depending on panel size and access. DIY re-splining costs far less, mostly just materials.
How do you diagnose a popped screen panel?
A “popped” panel means the screen mesh has pulled free from the frame channel, usually because the rubber spline holding it in place has dried out, contracted, or broken. That’s the most common failure mode in Florida, where UV exposure and heat accelerate spline degradation. But not every loose panel has the same cause, and picking the wrong fix wastes time and money.
Run through these three failure modes before you touch a tool:
- Spline failure: The mesh itself looks fine but has pulled out of the channel along one or more edges. Press the mesh near the channel. If it flexes loosely with no resistance, the spline has either dried and shrunk or snapped. This is the easiest fix: re-spline with the mesh in place or with a fresh sheet.
- Torn or damaged mesh: You can see holes, rips, or fraying. Tears under about 3 inches can be patched temporarily; anything larger or with a ragged edge running toward a corner needs a full panel replacement. UV degradation, storm debris, and pets are the most common culprits in Florida.
- Frame or anchor damage: The aluminum frame member is visibly bent, cracked, or the anchor bolts at the base are rusted through or heaved out of the concrete. This is not a DIY repair. Bent frames and failed anchors affect the structural integrity of the enclosure and may require a permit to fix correctly.
Diagnostic order: First, press-test the mesh tension across the panel. Then run your finger along the spline channel to feel for gaps or dried rubber. Next, sight down the frame members for bends or kinks. Finally, check the base anchors for rust, movement, or concrete cracking around the fasteners.
Decision signals at a glance:
- Re-spline if: mesh is intact, spline is loose or missing, and the frame is straight.
- Replace the panel if: tear is larger than 3 inches, mesh is brittle or faded, or the edge is ragged.
- Call a pro if: frame is bent, anchors are compromised, or multiple panels are failing at once.
What tools and materials do you need before starting?
Getting everything together before you climb the ladder saves you a second trip to the hardware store mid-job. Here’s what a standard re-spline or panel replacement requires.
| Item | What to look for | Notes |
|---|---|---|
| Spline roller | Dual-wheel (convex + concave) | Flat spline is standard for Florida pool cages |
| Flat-head screwdriver | Narrow blade | For lifting spline out of channel |
| Utility knife | Fresh blade | Dull blades tear mesh instead of cutting cleanly |
| Tape measure | Standard 25-ft | For measuring panel dimensions |
| Work gloves | Cut-resistant | Mesh edges are sharp |
| Ladder or step stool | Rated for your weight | Non-slip feet; have a helper if working above 6 ft |
| Temporary clips or clamps | Screen installation clips | Holds mesh taut while you roll in spline |
| Replacement mesh | 18×16 fiberglass or 20×20 no-see-um | Match existing mesh type; buy 10% extra |
| Replacement spline | Flat spline, sized to channel | Measure channel width before buying |
| Patch kit | Adhesive mesh patches | For small tears only |
| Stainless screws | #8 or #10 self-tapping | Only if replacing corroded fasteners |
Matching spline to your channel is critical. The wrong diameter either pulls out under tension or distorts the mesh as you roll it in. Measure the channel width with a tape measure or calipers before you buy. Matching spline diameter to the frame channel is one of the most commonly skipped steps, and it’s the reason many DIY repairs fail within weeks.
For mesh type: standard 18×16 fiberglass works for most pool cages. If you’re near the water or dealing with no-see-ums, step up to 20×20. Pet-resistant mesh (typically a heavier weave) is worth the extra cost if pets or wildlife are a recurring issue.
Storing mesh before installation: Keep rolled mesh in a cool, dry place and never fold it. Creases become permanent wrinkles once the spline locks the mesh in place, and a wrinkled panel looks bad and weakens faster.
How do you re-spline a popped panel step by step?
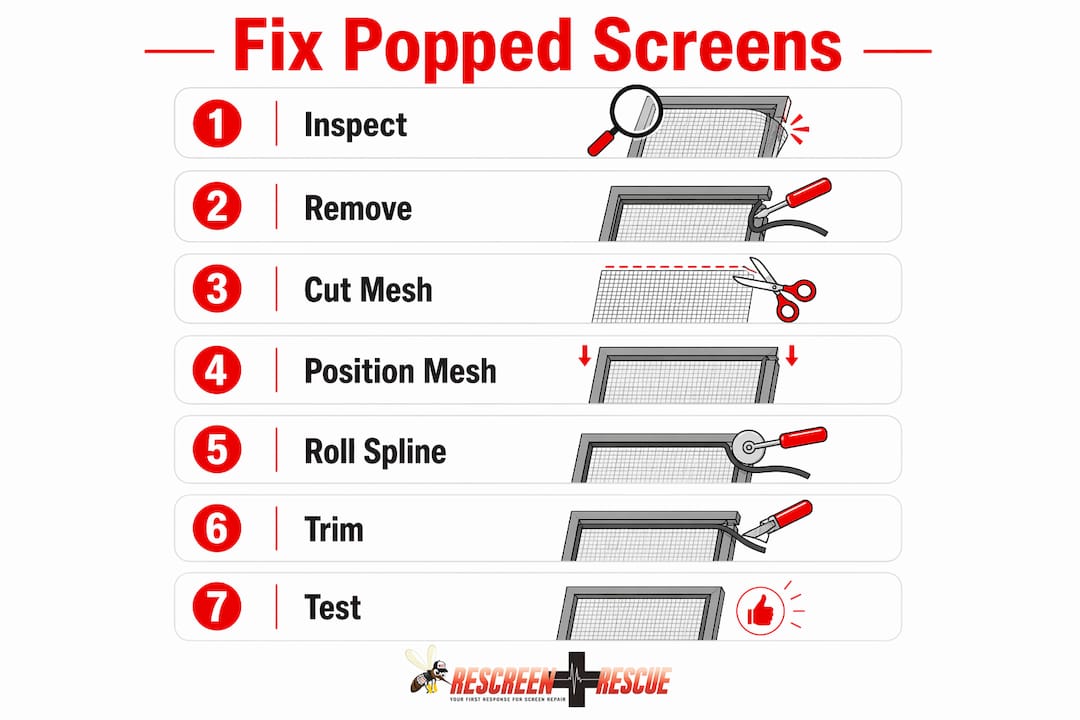
Re-splining is the right fix when your mesh is sound and only the spline has failed. Most homeowners with basic tool experience can complete one panel in 30–90 minutes. Difficulty: moderate.
- Remove the old spline. Use needle-nose pliers or a flat-head screwdriver to catch the spline end at a corner and pull it free from the channel. Work slowly to avoid gouging the aluminum. Once the spline is out, the old mesh will release easily.
- Clean the channel. Wipe out any dried rubber residue, dirt, or debris with a dry cloth. A clean channel lets the new spline seat fully and grip evenly.
- Position the new mesh. Lay the replacement mesh over the frame, overlapping each edge by at least an inch. Use installation clips (not tape) to hold the mesh taut at all four corners before you touch the spline roller. Clips let you adjust tension; tape does not hold reliably on aluminum.
- Roll in the spline at the top edge. Start at one corner, pressing the spline into the channel at roughly a 45-degree angle with the roller’s concave wheel. Work toward the opposite corner in one continuous pass. Keep steady, even pressure.
- Do the bottom edge next, then the sides. Pull the mesh gently taut as you go. The goal is consistent tension across the entire panel, not maximum tightness. Over-tensioning causes bowing; under-tensioning causes sagging.
- Handle corners carefully. At each corner, fold the mesh neatly rather than bunching it. A small fold pressed flat before the spline goes in prevents the lumpy corners that let bugs through.
- Trim the excess mesh. Once all four sides are splined in, run a sharp utility knife along the outer edge of the spline channel to cut away the overhang. Keep the blade angled away from the frame to avoid scratching the aluminum.
- Final tension check. Press the center of the panel with your palm. It should feel firm and spring back slightly. Any loose areas mean the spline didn’t seat fully; remove that section and re-roll.
Pro Tip: Roll the spline in at a consistent angle and speed. Rushing the corners is where most wrinkles start. If you see a wrinkle forming, pull the spline back out of that section immediately and re-tension the mesh before continuing.
Common errors: using round spline in a flat-spline channel (it won’t hold), skipping the corner fold (creates gaps), and trimming before all four sides are done (mesh shifts).
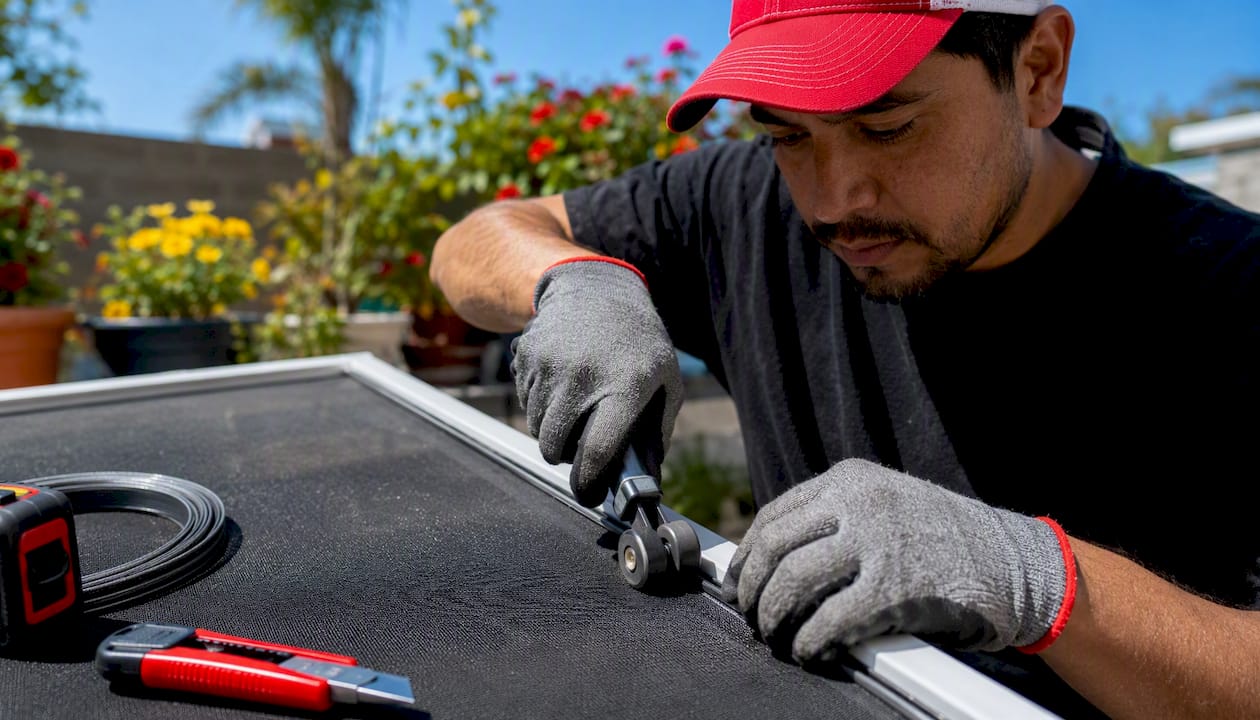
How do you remove and replace a full screen panel?
When the mesh is torn beyond patching or too brittle to re-spline, you need a full panel replacement. Start by measuring accurately.
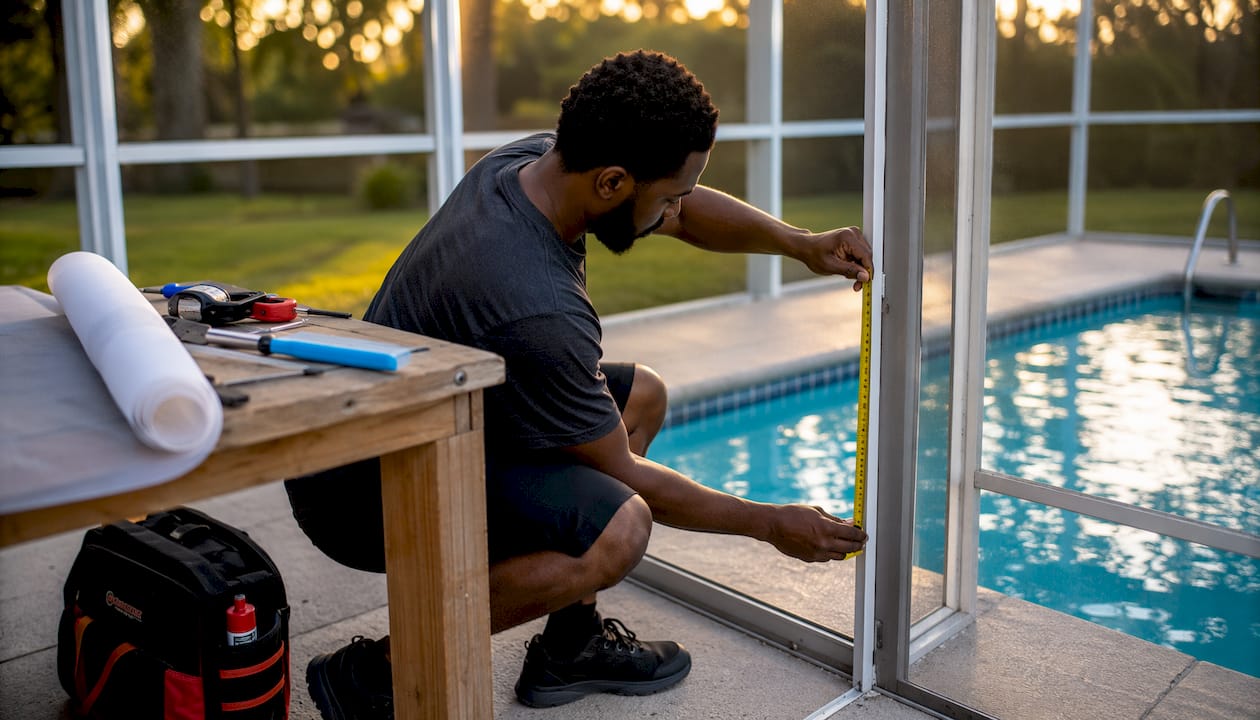
Measuring the panel: Measure the opening from inside edge to inside edge of the frame channel on all four sides. Add 2 inches to each dimension for overlap. Write it down before you cut anything.
Removing the old mesh and spline: Pull the spline out as described above. Once it’s free, the old mesh lifts out. If the mesh is stuck or brittle, it may crumble; wear gloves and clear all fragments from the channel before proceeding. Check the channel itself for dents or deformation that could prevent the new spline from seating.
Corner and door panels: Corner panels often have an angled frame member. Measure each side independently rather than assuming symmetry. Door panels require extra care around hinges and the threshold sweep. Remove the door from its hinges before replacing the mesh if possible; it’s much easier to work on a flat surface. Reattach hinges and check the door swing before calling the job done.
Installation: Follow the same clip-and-roll sequence from the re-spline steps above. For larger panels, a second person holding the mesh taut while you roll in the spline makes a noticeable difference in the final tension. Experienced DIYers typically complete one full panel replacement in one to a couple of hours.
What are the quick patch options for small tears?
For a hole under about 3 inches, a patch buys you time until you can do a proper re-spline or replacement. These are not permanent fixes, especially in a high-wind area.
- Adhesive mesh patches: Peel-and-stick patches available at most hardware stores. Clean the area around the tear first, press the patch flat, and smooth out any air bubbles. Best for round or oval holes. They hold well in calm conditions but can peel in sustained wind or direct sun.
- Vinyl screen repair patches: Slightly more durable than basic adhesive patches. Apply the same way. Good for tears up to about 3 inches on a flat section of mesh.
- Needle and thread (for very small rips): A few stitches of monofilament fishing line or nylon thread can close a pinhole or a short linear rip. This works best on fiberglass mesh and is nearly invisible when done carefully.
Durability note: Patches are a short-term measure. In Florida’s heat and humidity, adhesive patches typically last weeks to a few months before the edges lift. They slow insect entry but offer no structural benefit. In a high-wind zone, a patched panel should be treated as temporary and replaced before storm season.
What do repairs cost, and when does full rescreening make more sense?
| Repair type | Typical DIY cost | Typical pro cost | Durability | Best when |
|---|---|---|---|---|
| Adhesive patch | Under $10 | N/A | Weeks to months | Hole under 3 inches, temporary fix |
| Re-spline (single panel) | $10–$25 materials | Low double to low triple digits | Several years | Mesh intact, spline failed |
| Full panel replacement | $20 materials | Mid-to-upper range per panel | Several years | Tear too large to patch |
| Full rescreen | — | Varies by enclosure size | 10–15 years | Widespread damage, old enclosure |
Time estimates: A DIY re-spline on one panel takes 30–90 minutes once you have your materials. A full panel replacement runs 1–2 hours for a homeowner with basic tool experience. A professional visit for a spot repair typically includes inspection time; scheduling lead times vary by season in the Tampa Bay area.
The decision rule: Repair makes sense for isolated panel damage on an otherwise healthy enclosure. Full rescreening becomes the smarter investment when damage is widespread, screens are sagging or pooling water, or the mesh is pervasively faded and brittle. The practical age threshold most contractors use is 10–15 years: if your enclosure is in that range and you’re seeing multiple torn panels, sagging, or repeat tears after spot repairs, a full rescreen will cost less over the next five years than repeated patch jobs.
DIY or hire a pro — how do you decide?
The honest answer: most single-panel re-splines are within reach for a careful homeowner. Anything involving the frame, anchors, or a large number of panels is a different situation.
Hire a pro when:
- The frame member is bent, cracked, or misaligned.
- Anchor bolts are rusted, sheared, or the concrete footing is heaved.
- More than 25% of the panels need replacement at once.
- You’re not comfortable on a ladder at height.
- The enclosure is in a coastal high-wind zone and the damage is near a structural connection.
- Work affects structural members or replaces a significant portion of the mesh area, which can trigger county permit requirements.
Questions to ask any contractor:
- Are you licensed and insured in Florida?
- What mesh type and spline will you use, and can you match my existing mesh?
- Do you provide a written warranty on labor and materials?
- Will this work require a permit, and will you handle it?
- Can you give me a line-item estimate rather than a single lump sum?
Red flags: vague verbal estimates with no written follow-up, quotes that don’t mention hardware or anchor inspection, and contractors who can’t tell you the mesh specification they plan to install.
A professional’s workflow typically runs: walk the enclosure and document damage, measure each panel, strip old spline and mesh, roll in new mesh with proper tension, trim, and do a final walk-through. A good contractor matches your existing mesh type so repaired panels don’t stand out visually.
Why wind code and enclosure age matter for your repair decision
Florida’s coastal counties fall under strict wind-design requirements, and Pinellas and Hillsborough are no exception. The state’s High Velocity Hurricane Zone (HVHZ) standards set specific requirements for how structural components must be built and anchored to withstand hurricane-force winds. Screen enclosures are not exempt.
For homeowners in coastal Florida counties, any repair that touches anchor bolts, frame connections, or replaces a substantial portion of the mesh area may require a building permit and inspection. Small cosmetic mesh replacements typically don’t trigger permits, but structural work does. When in doubt, call your county building department before you start.
HVHZ wind-load requirements mean that a frame repair done incorrectly isn’t just an aesthetic problem. It can become a safety issue in a named storm. If your enclosure is showing signs of anchor failure or frame damage, a licensed contractor with Florida enclosure experience should inspect it before the next hurricane season.
Age matters too. Enclosures over 10–15 years old that show distributed brittleness, sagging mesh, or signs like water pooling on screens across multiple panels are often past the point where spot repairs are economical. The mesh itself has degraded, and new spline in old brittle mesh won’t hold for long.
Key Takeaways
A popped screen panel is almost always fixable at home when the mesh is intact and the frame is straight; re-splining is the fastest, lowest-cost repair for most Florida homeowners.
| Point | Details |
|---|---|
| Inspect before buying anything | Check spline, mesh condition, and frame before choosing a repair method. |
| Re-spline for spline failure | When mesh is intact and spline has dried or pulled free, re-splining restores the panel for $10–$25 in materials. |
| Patch only for small tears | Adhesive patches work for holes under 3 inches but are temporary, especially in high-wind areas. |
| Call a pro for structural damage | Bent frames, failed anchors, or damage over 25% of the enclosure panels warrant a licensed contractor. |
| Rescreen at 10–15 years | Widespread brittleness or repeated failures signal that full rescreening is more cost-effective than ongoing spot repairs. |
| Rescreen Rescue for local repairs | Rescreen Rescue serves Pinellas and Hillsborough counties with free estimates and professional re-spline, panel replacement, and full rescreening services. |
What the field actually tells us about popped panels
The most common call Rescreen Rescue gets isn’t after a hurricane. It’s in the weeks following a dry spell, when Florida’s heat has baked the spline rubber until it contracts and lets the mesh pop free along one edge. Homeowners often assume the storm did it, but the spline was already failing before the wind arrived.
The fastest field fix that prevents callbacks is this: when you re-spline, don’t just replace the section that popped; consider professional rescreening and repairs for storm-prone areas from One Day Doors & Closets of Treasure Coast. Pull the spline on all four sides of that panel and replace it completely. Partial re-splines leave dried spline in the remaining channels, and the panel will pop again within a season.
After any significant storm, walk your enclosure and press-test every panel before you look for visible tears. A panel that feels loose but looks fine is the one that will pop in the next wind event. Catching it early costs you $15 in materials. Waiting costs you a full panel replacement.
Rescreen Rescue handles it when you’d rather not DIY
When a repair goes beyond a single panel or you’d rather have it done right the first time, Rescreen Rescue offers free on-site estimates for homeowners across Pinellas and Hillsborough counties, with service extending to neighboring areas.

Every estimate includes a full walk of the enclosure: mesh condition, spline channels, frame members, and anchor hardware. You get a line-item breakdown, not a single number, so you know exactly what you’re paying for. If the work touches structural components, Rescreen Rescue will flag any permit requirements upfront. Materials are high-quality and matched to your existing mesh type so repairs blend in rather than stand out.
With over 20 years of experience in pool cage and outdoor enclosure repair, the team handles everything from a single popped panel to a full rescreen. Warranties cover both labor and materials. To schedule your free estimate, visit rescreenrescue.com or call directly.
Further reading and authoritative sources
- Florida Building Code HVHZ guide: The clearest plain-language explanation of High Velocity Hurricane Zone requirements and what they mean for enclosure repairs in coastal counties.
- Fabri-Tech pool screen maintenance guide: Covers routine maintenance, spline matching, and when multiple worn panels signal a full rescreen.
- Pool Screens R Us DIY repair walkthrough: Step-by-step video-based guide showing the clip-and-roll installation method for Florida pool cage panels.
- Florida Pool Repair Service — permitting guidance: Explains when cosmetic mesh work stays permit-free and when structural repairs trigger county inspections.
- Rescreen Rescue service page: Covers the full scope of repair, rescreening, and restoration services for Pinellas, Hillsborough, and neighboring counties, with free estimate booking.
- Your county building department: For Pinellas County, visit the Pinellas County Building Department online; for Hillsborough, the Hillsborough County Development Services portal handles permit questions for enclosure work.
FAQ
How much does it cost to fix a screen panel?
DIY re-splining a single panel typically costs $10–$25 in materials. Professional screen repair costs range from the low double digits to the low triple digits per panel depending on size, access, and whether hardware replacement is needed.
Can you repair screens that are splitting at the seams?
Yes, if the split is along the spline channel and the mesh is otherwise intact, re-splining the affected edge restores the panel. If the mesh itself is splitting or fraying, a full panel replacement gives a more durable result than patching.
How do you replace a screen panel yourself?
Measure the opening, cut replacement mesh with 2 inches of overlap on each side, use installation clips to hold it taut, then roll flat spline into the channel with a spline roller. Trim the excess with a utility knife once all four sides are secured.
When should you rescreen instead of repair?
Widespread damage, sagging panels, or pervasive brittleness across multiple sections of the enclosure are the clearest signals. If your enclosure is 10–15 years old and you’re making repeated spot repairs, a full rescreen is usually more cost-effective long-term.
Does fixing a screen panel require a permit in Florida?
Small cosmetic mesh replacements typically don’t require a permit. Work that alters structural frame members, replaces a significant portion of the mesh area, or involves anchor hardware may trigger county permit requirements and inspections. Check with your county building department before starting structural work.
This article provides general information for homeowners and is not a substitute for advice from a licensed Florida contractor or your local building department. Permit requirements and code thresholds vary by county; confirm current rules with your local authority before beginning any structural repair.